Wooden pallets are readily available materials from which you can build low-cost DIY rabbit cage. This is a nice way to put your crafts into practice or at least learn something new. All you need is basic construction tools and materials.
Following is a guide on how to create a rabbit hutch out wood pallets. We also to include tips to ensure your hutch is safe and comfortable. A good and safe cage means happy and healthy bunnies.
Step #1 Planning /Designing the Cage
First, locate a protected space, preferably one that has a shade, where you plan to set up the hutch. The spot should prevent poor weather conditions from harming the bunnies.
Rabbits are easily affected by extreme weather conditions. They sweat using pads found on their feet when exposed to heat; hence, they can easily develop heatstroke. Extremely cold weather also affects them. You must, therefore, find a spot that offers a conducive temperature.
In your design plan keep note of the following
- Choose appropriate hutch parameters such as width, depth, and height. Ensure that the hutch is at least six feet long, five feet deep and has an appropriate height. This ensures the rabbits never hit the ceiling whenever they jump. In case you plan to accommodate several rabbits, increase the depth and height of the hutch appropriately.
- Pick an appropriate height for the cage to prevent predators from accessing the bunnies. This should be at least three feet from the ground.
- Ensure the cage you plan on constructing is long such that there are two sections. One section is designated for eating while the other, for sleeping. The sleeping partition requires solid sides to enable the rabbits to snuggle whenever the temperature drops.
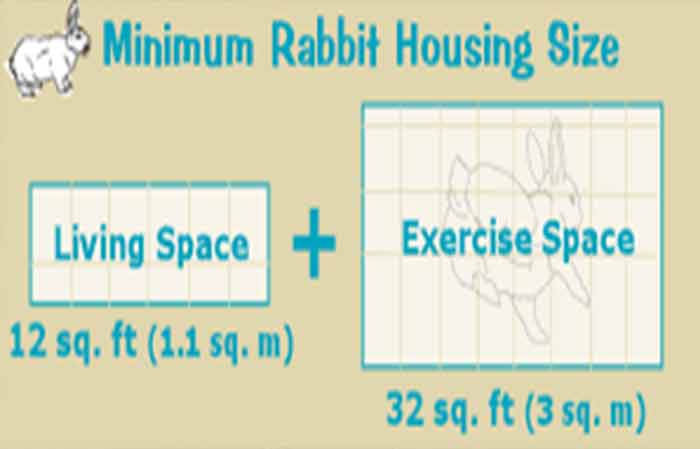
- Rabbits need sufficient space to play around, therefore plan on a large surface area to accommodate playing. You do not want to frustrate the bunnies.
- The roof can also act as the door. Attach the roof with hinges, such that you can open. Ensure the roof is pitched since such a roof will prevent water leakage whenever you clean the cage or when it rains.
Step #2 Constructing the Hutch from Wood Pallets
Following are the tools and steps to construct the floor, walls and roof
Tools & Materials
You will need the following tools and materials for construction:
- Hammer
- A cordless drill
- A radial saw
- Crowbar
- One box of 2.5-inch wood screws
- One box of 1.5-inch wood screws
- One box of horseshoe nails
- Two hinges
- A latch
- A 14 or 16 gauge rabbit wire mesh that is 30 inches by 10 inches. This prevents the bunnies’ heads from being stuck.
- You need enough wooden pellets preferably 48 inches by 38 inches.
- Find a metal mesh for the floor. This will allow urine to escape from the cage.
- Roof materials include hinges and wood pallets

Frame Section
- Begin with dismantling your pallets in case it is a solid structure. You need single wood pieces for the construction of different sections of the cage.
- Based on your cage design,
take measurements of each cage section then cut suitable pieces of lumber.
You should number each piece of wood to avoid confusion.
- Design a frame using the wood pieces then fasten the pallets onto it. You need to work systematically, operate on one section at a time. You can begin with the box structure, ensure is tall and sturdy. This will offer the bunnies security from predators and prevents accidents in the cage. Later on, fix the supports where the box will stand.
- Ensure the cage is long such that there are two sections. One section is designated for eating while the other part will be for sleeping. The sleeping partition requires solid sides to enable the rabbits to snuggle whenever the temperature drops.
- Now cut the wire mesh and attach it onto the open sections of the frame. Ensure that you screw at least four one-floor pieces and four-floor pieces to the cage using the staple gun. The final product should be slip-proof, therefore inspect it and correct regions with loose staples.
Wall Section
You need to separate the sleeping area from the feeding section of the cage. According to Rick Axelson, a pet rat specialist, this ensures that the sleeping section is protected from food particles and dirt.
Attach wood to create a strong wall by screwing the plywood directly to the frame but leave a space where the rabbits can get through easily. The sleeping partition requires solid walls to allow snuggling of the bunnies whenever it is cold.
Roof Section
- Using the completed floor section as a template, construct the top section. Ensure the pieces are of appropriate length, such that the roof is even. Attach the pallets to the roof section using the hammer and nails. Ensure the roof is completely sealed to prevent water leakage.
- Screw the hinges to the roof such that you can open it. Add some more planks on top of the roof wire to shield rain from the sleeping zone. Place some roofing material at the rooftop and ensure it is completely sealed.
- You must place a security latch on the roof. This will prevent the roof from being torn apart by strong wind and predators. Attach a structural piece on the sides then nail planks on it.
Step #3 Decorations and Making the Interior Comfy
Place the toys, bedding material the hutch. This makes your bunnies comfortable. If you have bunnies around, add food and water containers the finally introduce your rabbits into the new home.
See also…


